As many of you probably know, Game of Thrones Season 6 is starting next April 24th. Now I recently introduced myself on this blog, but forgot to mention that I'm, like millions of others, a shameless GoT fan. When our content guy asked me to craft a post showing how the easy e-commerce integration
we brag about would work with October CMS, I immediately picked GoT as a
theme for the demo.
So in this post, I'm going to show you how to set up a store selling
defense against the imminent White Walkers invasion. Because WINTER IS
COMING big time, you know.

More specifically, I'll provide a step-by-step e-commerce tutorial
explaining how to integrate our shopping cart platform to an October CMS
site. Let's get into it.
More specifically, I'll provide a step-by-step e-commerce tutorial
explaining how to integrate our shopping cart platform to an October CMS
site. Let's get into it.
To do so you want your
You could skip this step and manually enter your API key in the script tag, but it is more convenient for an ulterior user if it is configured this way.
After you've selected your page, you can click on the Components tab to access your new Product component. Click on the box to edit the product properties.
After you've selected your page, you can click on the Components tab to access your new Product component. Click on the box to edit the product properties.
We will now create 3 (awesome) products for our GoT demo store:

More specifically, I'll provide a step-by-step e-commerce tutorial
explaining how to integrate our shopping cart platform to an October CMS
site. Let's get into it.
What is October CMS
We've been hearing about October CMS from developers here and there for a while now. This free, open-source CMS platform is the brainchild of fellow Canadian Alexey Bobkov and Australian Samuel Georges. It's based on the Laravel PHP Framework and aims at bringing website building back to its effective basics. It champions a simple & modular approach to development, which makes it a perfect fit for Snipcart! Check out their Features page and learn more about the minimalistic PHP platform. Integrating Snipcart to an October CMS e-commerce site
For developers, enabling e-commerce on the platform with Snipcart is easy enough. Of course, you will first need October CMS with a website up and running on a repo of your own. :) Note: For this post, we're assuming you're already familiar with October CMS. If you're not, take some time to read some of their helpful resources & tutorials. 1. Create an October component for your store products
Head to your October components directory. From there, create a new component extending theComponentBase class.
The componentDetails function gives your component context in the CMS.
And the defineProperties function creates your component's properties in the CMS so you can give them values. Here's what it should look like:
<?php namespace Snipcart\Snipcart\Components;
use Cms\Classes\ComponentBase;
use Snipcart\Snipcart\Models\Settings;
class BuyButton extends ComponentBase
{
    public function componentDetails()
    {
        return [
            'name'        => 'BuyButton',
            'description' => 'Add a snipcart product to your page'
        ];
    }
    public function defineProperties()
    {
        return [
            'id' => [
                'description'       => 'The desired id of your product',
                'title'             => 'Id',
            ],
            'name' => [
                'description'       => 'The desired name of your product',
                'title'             => 'Name',
            ],
            'url' => [
                'description'       => 'The url where your product resides',
                'title'             => 'URL',
            ],
            'image' => [
                'description'       => 'The path to the image ressource',
                'title'             => 'Image',
            ],
            'description' => [
                'description'       => 'The description of your product',
                'title'             => 'Description',
            ],
            'price' => [
                'description'       => 'The price of your product',
                'title'             => 'Price',
            ]
        ];
    }
}
2. Create a template for your component
What you want to do now is create your component's template. This represents the view that will be rendered once your product is on a page. Your template has to be in a folder with the same name has your component class. This folder also has to be in the components folder. You can access your component properties with the{{__SELF__.property({your-property-name}) }} notation. Your template should look something like this:<div>
<h2>{{ __SELF__.property('name') }}</h2>
<img src="{{ __SELF__.property('image') }}" height="150">
<div><h4>{{ __SELF__.property('description') }}</h4></div>
<button
class="snipcart-add-item"
data-item-id="{{ __SELF__.property('id') }}"
data-item-name="{{ __SELF__.property('name') }}"
data-item-price="{{ __SELF__.property('price') }}"
data-item-url="{{ __SELF__.property('url') }}"
data-item-description="{{ __SELF__.property('description')}}">
Buy {{__SELF__.property('name')}}
</button>
</div>
3. Create a model
You want to create a settings model so you can store your Snipcart API key and manage it directly in the CMS (you'll gain access to your API key after signing up for Snipcart).To do so you want your
Settings class to extend Model and implement the SettingsModel behavior.You could skip this step and manually enter your API key in the script tag, but it is more convenient for an ulterior user if it is configured this way.
<?php namespace Snipcart\Snipcart\Models;
use Model;
class Settings extends Model
{
    public $implement = ['System.Behaviors.SettingsModel'];
    // A unique code
    public $settingsCode = 'snipcart_settings';
    // Reference to fields configuration
    public $settingsFields = 'fields.yaml';
}
4. Create your fields
We now need a YAML file to create the fields that will be used in ourSettings class.fields:
api_key:
label: Api Key
description: Enter your api key
fields.yaml that our $settingsFields is referencing.5. Create the plugin
You now want to wrap everything together in a custom plugin. Create a Plugin.php that looks like that: <?php namespace Snipcart\Snipcart;
use System\Classes\PluginBase;
class Plugin extends PluginBase
{
public function pluginDetails()
{
return [
'name' => 'Snipcart',
'description' => 'Integrate Snipcart with October CMS',
'author' => 'snipcart',
'icon' => 'icon-leaf'
];
}
public function registerComponents()
{
return [
'Snipcart\Snipcart\Components\BuyButton' => 'BuyButton'
];
}
public function registerSettings()
{
return [
'settings' => [
'label' => 'Api Key',
'description' => 'Manage your Api Key.',
'category' => 'Snipcart',
'icon' => 'icon-cog',
'class' => 'Snipcart\Snipcart\Models\Settings',
'order' => 500
]
];
}
}
6. Add the Snipcart required files
We're almost there! To make the final link you need to add the Snipcart assets. You'll need to create anonRun() function to you component class.public function onRun()
{
$this->addJs("https://cdn.snipcart.com/scripts/snipcart.js", [
'id' => 'snipcart',
'data-api-key' => Settings::get('api_key')
]);
$this->addCss("https://cdn.snipcart.com/themes/base/snipcart.min.css");
}
snipcart
¦   Plugin.php
+---components
¦   ¦   BuyButton.php
¦   +---buybutton
¦           default.htm
+---models
    ¦   Settings.php
    +---settings
            fields.yaml
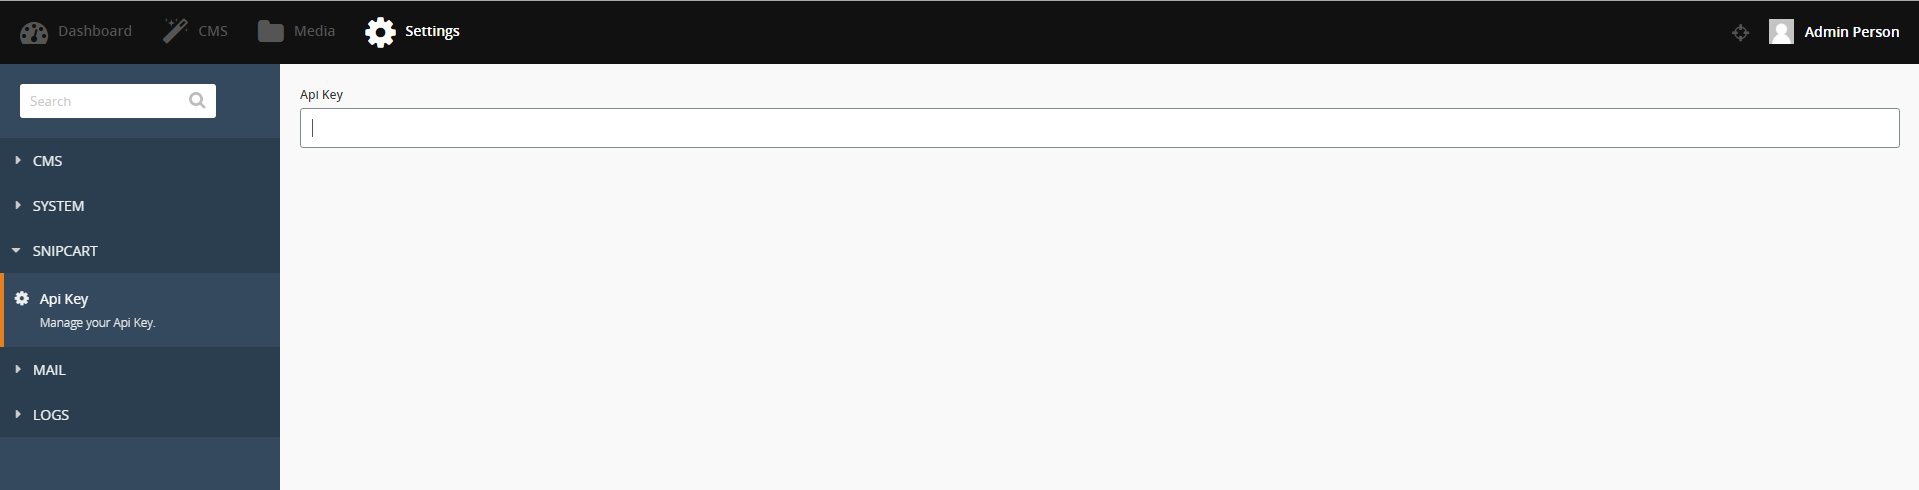
7. Add your API key in the CMS
You will now have access to a Snipcart tab in the Settings panel. You can enter you API key to store it in your database.8. Create a Snipcart buybutton for your store
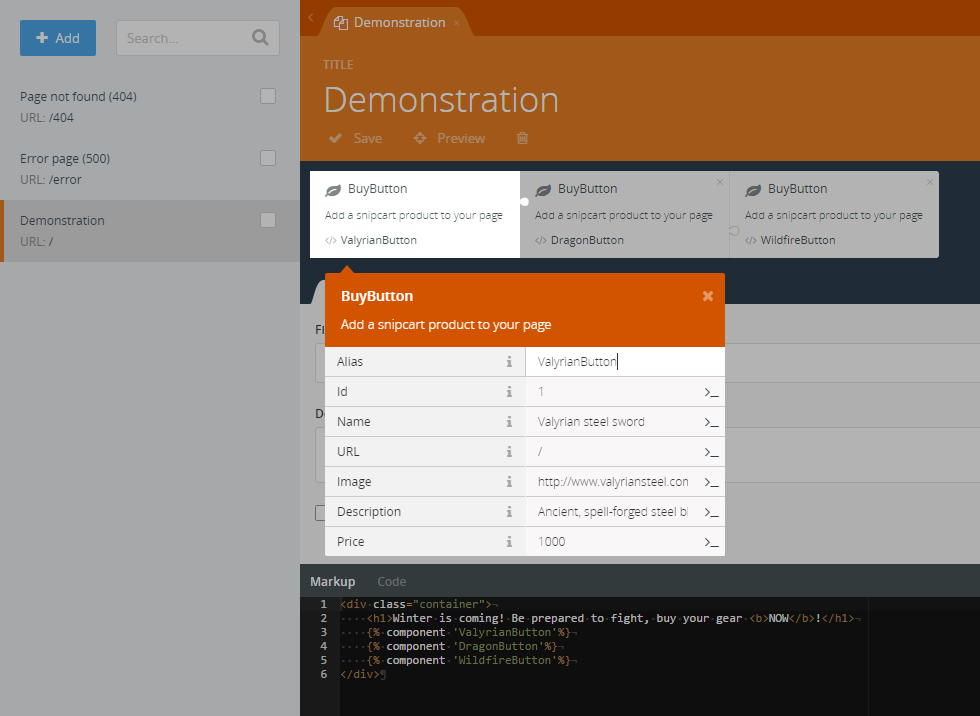
Go to your CMS dashboard and select the page where you want to add products.
After you've selected your page, you can click on the Components tab to access your new Product component. Click on the box to edit the product properties.We will now create 3 (awesome) products for our GoT demo store:
1. Valerian steel sword
2. Dragonglass arrows
3. Wildfire flasks
<div class="container">
    <h1>Winter is coming! Be prepared to fight, buy your gear <b>NOW</b>!</h1>
    {% component "ValyrianButton" %}
    {% component "DragonButton" %}
    {% component "WildfireButton" %}
</div>
6. Cash out on the White Walkers' invasion of Westeros
Aaaaand you should now have a killer Game of Thrones store up and running with Snipcart & October CMS! Time to sell survival and protection items to the good folks of Westeros. Here's a snapshot of the demo store I built following the above steps:
Check out our GitHub repo for the demo code. :)
If you are looking for the best, then try LimeTank.com - Rest is the noise
ReplyDeleteExcellent information on your blog, Web Design & Development Company in Bangalore | Website Design Company in Bangalore | Web Designing Company in Bangalore | Web Design Companies in Bangalore
ReplyDeleteNice Post.,Thanks For Sharing...
ReplyDeleteWeb Design Company in Bangalore | Web Development Company in Bangalore | Advertising Agencies in Bangalore | SEO Company in Bangalore | Digital Marketing Companies in Bangalore | Ecommerce Website Development in Bangalore | Mobile App Development Company in Bangalore